“The secret of great cooking is to make it simple, yet profound.” – Auguste Escoffier
- The Foundation: Selecting and Preparing Your Chicken Breasts
- Mastering the Dredging Station: The Triple Threat
- The Cooking Medium: Pan-Frying vs. Baking vs. Air Frying
- The Nuances of Panko: Beyond the Basic Bag
- The Science of Sizzle: Heat, Moisture, and Maillard
- Serving Suggestions and Pairings
- Frequently Asked Questions
Few culinary pursuits offer such immediate, almost primal satisfaction as achieving truly *crispy* food. When it comes to chicken breasts, this textural triumph is often the elusive holy grail, a delicate balance between a perfectly rendered crust and a juicy, tender interior. For years, home cooks have grappled with the common pitfalls: soggy coatings, burnt exteriors, or dry, overcooked meat. But what if the path to Panko perfection was less about arcane kitchen magic and more about understanding fundamental principles, honed through rigorous practice and a dash of culinary science? This article demystifies the process, offering actionable, field-tested insights that elevate your crispy Panko chicken breasts from merely good to absolutely unforgettable.
The allure of Panko breadcrumbs is undeniable. Their larger, flakier structure, a byproduct of their unique baking process, creates an unparalleled crispness and a delightful crunch that standard breadcrumbs simply cannot replicate. However, simply dredging chicken in Panko and frying won’t guarantee success. The real artistry lies in the preparation, the cooking medium, and the subtle nuances of technique that ensure each bite is a symphony of texture and flavor. This isn’t just about following a recipe; it’s about understanding the ‘why’ behind each step, allowing you to adapt and excel even beyond these guidelines.
The pursuit of perfect crispiness in Panko-coated chicken is a journey of mastering moisture management and heat control, transforming humble ingredients into a culinary masterpiece.
The journey to crispy Panko chicken breasts begins long before the pan heats up. It starts with the selection of the chicken itself, the meticulous preparation of the dredging station, and a deep understanding of how these elements interact during the cooking process. We explore the science behind achieving that sought-after golden hue and satisfying crunch, drawing upon decades of culinary wisdom and modern gastronomic insights.
The Foundation: Selecting and Preparing Your Chicken Breasts
The quality of your final dish is intrinsically linked to the quality of your primary ingredient. For Panko-crusted chicken breasts, lean, boneless, skinless cuts are the standard, but even within this category, there are critical considerations.
Choosing the Right Cut
Opt for chicken breasts that are of uniform thickness. This is paramount for even cooking. Thicker breasts often taper to a thinner end, which can cook much faster and become dry by the time the thicker portion is done. If your breasts are uneven, a simple technique known as “butterflying” or “pounding” can equalize their thickness.
- Butterflying: Slice the breast horizontally, almost all the way through, so it opens like a book. This increases the surface area and allows for more even cooking.
- Pounding: Place the chicken breast between two sheets of plastic wrap or parchment paper and gently pound it with a meat mallet, rolling pin, or even the flat side of a heavy pan. Aim for an even thickness of about ½ to ¾ inch (1.2 to 1.9 cm). This process not only ensures even cooking but also tenderizes the meat.
The Importance of Brining (Wet or Dry)
This is a critical step often overlooked by home cooks aiming for ultimate juiciness. Brining helps the chicken retain moisture during cooking and can also season the meat all the way through.
- Wet Brine: A solution of water, salt, and sometimes sugar (and aromatics like herbs or garlic). Chicken breasts are submerged in this solution for 30 minutes to 4 hours (depending on concentration and size). Research suggests the salt denatures proteins, allowing them to absorb and retain more water.
- Dry Brine: Simply salting the chicken breasts generously and letting them rest in the refrigerator for at least 30 minutes, or ideally several hours to overnight. The salt draws out moisture, dissolves into a brine on the surface, and then reabsorbs into the meat, seasoning it deeply and improving its moisture-retaining capacity.
Studies have highlighted how brining significantly improves the juiciness and flavor of poultry, demonstrating a measurable increase in moisture content after cooking compared to unbrined samples. This is not just a chef’s trick; it’s scientifically backed.

Mastering the Dredging Station: The Triple Threat
The success of your crispy Panko crust hinges on a well-constructed dredging station. This multi-stage process ensures the Panko adheres beautifully, creating a robust, shatteringly crisp exterior. The classic “flour, egg, breadcrumb” method is tried and true, but the details matter.
Stage 1: The Flour Foundation
Begin with a layer of all-purpose flour. Season it generously with salt and pepper. Some chefs also add a pinch of garlic powder or onion powder to this flour layer for an extra flavor boost. The flour provides a dry surface for the egg to adhere to, preventing the Panko from becoming clumpy.
Stage 2: The Egg Wash Binder
Next, an egg wash. Whisk 2-3 large eggs with a tablespoon or two of milk or water. This liquid base is crucial for binding the flour to the chicken and, more importantly, for providing a sticky surface for the Panko to cling to. Ensure the chicken is fully coated in the egg wash.
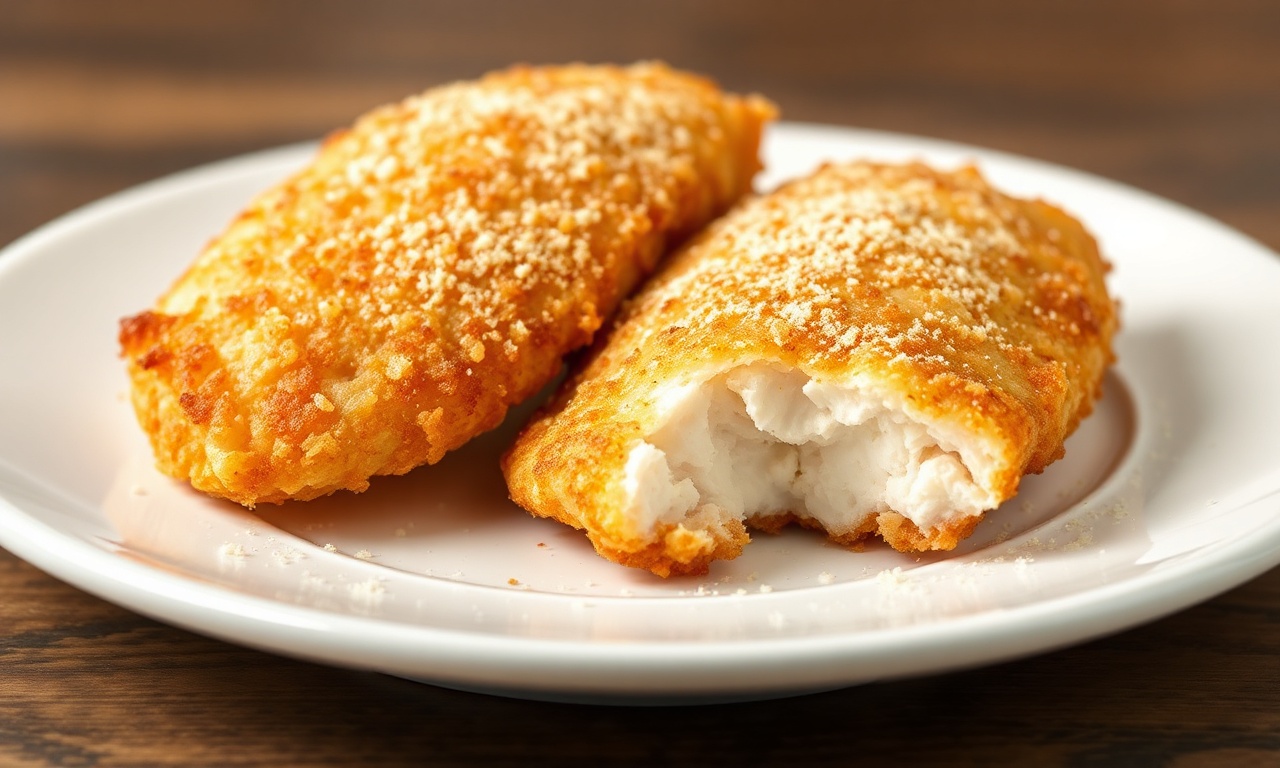
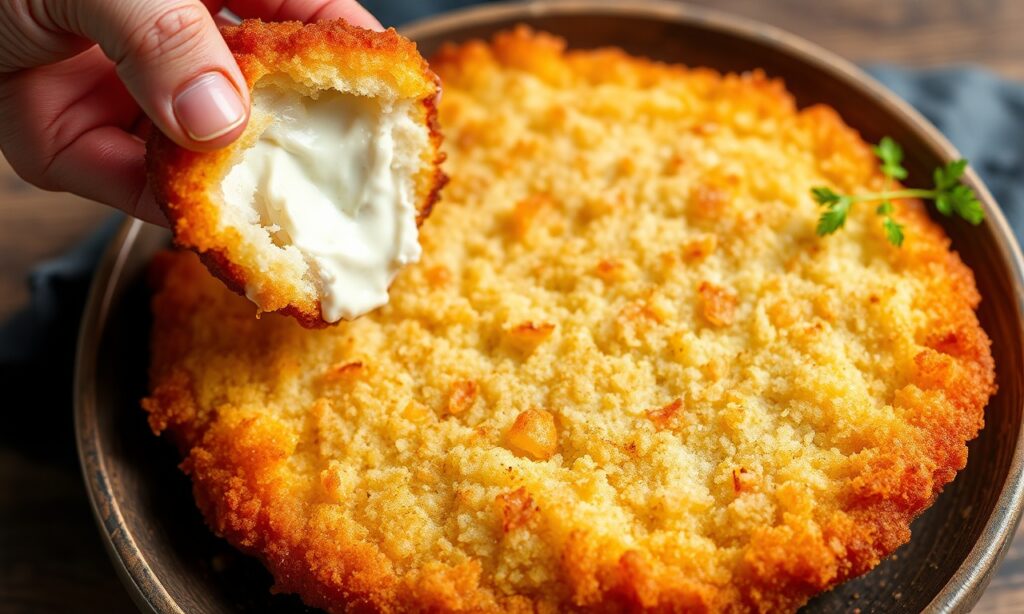
Stage 3: The Panko Embrace
This is where the magic happens. Spread a generous amount of Panko breadcrumbs in a shallow dish. For an even crispier crust, consider mixing in a tablespoon or two of finely grated Parmesan cheese. Gently press the egg-coated chicken breasts into the Panko, ensuring they are thoroughly covered on all sides. Avoid simply shaking the chicken in the Panko; a gentle pressing motion ensures better adhesion.
The Cooking Medium: Pan-Frying vs. Baking vs. Air Frying
Each cooking method offers distinct advantages and challenges when aiming for crispy Panko chicken breasts. Understanding these differences allows you to choose the best approach based on your equipment and desired outcome.
Pan-Frying: The Classic Approach
Pan-frying in a neutral oil (like canola, vegetable, or grapeseed) at a moderate temperature (around 350°F or 175°C) is the most traditional method for achieving a deeply golden and crispy crust.
- Oil Selection: Use an oil with a high smoke point. The oil should be deep enough to come about halfway up the sides of the chicken breast.
- Temperature Control: Crucially, do not overcrowd the pan. Overcrowding lowers the oil temperature, leading to greasy, soggy chicken rather than a crisp exterior. Fry in batches.
- Flipping: Use tongs to carefully flip the chicken once the first side is golden brown and crisp, typically after 3-5 minutes, depending on thickness. Continue to cook for another 3-5 minutes on the second side until golden and cooked through.
Baking: A Lighter, Hands-Off Option
Baking can yield a good crisp, especially when done at higher temperatures and with a little help from oil.
- Preheat Oven: Preheat your oven to a high temperature, usually 400-425°F (200-220°C).
- Racking: Place the Panko-coated chicken breasts on a wire rack set inside a baking sheet. This allows air to circulate around the chicken, promoting crispiness on all sides.
- Oil Application: Lightly spray or brush the tops of the chicken breasts with cooking oil before baking. This helps to crisp up the Panko.
- Flipping: For maximum crispness, you may want to flip the chicken halfway through the baking time (typically 15-25 minutes total, depending on thickness).
Air Frying: The Modern Marvel
Air fryers excel at creating a crispy texture with significantly less oil.
- Preheat Air Fryer: Preheat your air fryer to 375-400°F (190-200°C).
- Arrange in Basket: Place the Panko-coated chicken breasts in a single layer in the air fryer basket, ensuring they don’t touch.
- Cooking Time: Air fry for approximately 15-20 minutes, flipping halfway through, until golden brown and cooked through. Cooking times can vary significantly between air fryer models.
The Nuances of Panko: Beyond the Basic Bag
Not all Panko is created equal, and understanding its variations can unlock new levels of textural delight.
Types of Panko
- Standard Panko: The most common type, made from white bread. It’s light, airy, and provides a good crisp.
- Whole Wheat Panko: Offers a slightly nuttier flavor and a darker hue. It can be a bit denser than white Panko.
- Gluten-Free Panko: Made from rice flour or other gluten-free grains, these can be a good alternative for those with dietary restrictions, though their crisping properties might vary.
Enhancing the Panko Crust
Beyond Parmesan, consider adding other elements to your Panko mixture:
- Herbs: Finely chopped fresh herbs like parsley, chives, or thyme can add vibrant flavor.
- Spices: Smoked paprika, garlic powder, onion powder, or a touch of cayenne pepper can introduce warmth and depth.
- Sesame Seeds: Toasted sesame seeds can add a delightful nutty crunch and visual appeal.
Research has noted that the larger surface area of Panko particles contributes to increased oil absorption in a desirable way, leading to a crisper bite. This is why Panko is often favored for its superior texture.
The Science of Sizzle: Heat, Moisture, and Maillard
Achieving that perfect golden-brown crust is a dance between heat, moisture, and the Maillard reaction.
- Heat: Sufficient heat is essential to evaporate surface moisture quickly and initiate browning. Too low a heat, and the chicken steams; too high, and it burns before cooking through. A consistent, moderate-to-high heat is key.
- Moisture Management: The initial brining and proper drying of the chicken before dredging are crucial. Excess surface moisture from the chicken will prevent the Panko from adhering and will lead to a soggy coating. Ensure the chicken is patted dry after brining and before flouring.
- Maillard Reaction: This is a complex chemical process between amino acids and reducing sugars that occurs when food is heated, producing the desirable brown color and rich, savory flavors characteristic of well-cooked meat and toasted breadcrumbs. A well-executed Panko crust maximizes the surface area for this reaction to occur.
A real-world example of this principle in action can be seen in Japanese tonkatsu, where the meticulous preparation and frying of pork cutlets coated in Panko rely heavily on these scientific underpinnings to achieve their legendary crispness. The principles are directly transferable to chicken.
Serving Suggestions and Pairings
Crispy Panko chicken breasts are incredibly versatile. They can be served as a main course, sliced for salads, or incorporated into sandwiches.
- Classic Pairings: Serve with a side of lemon wedges, a simple green salad with vinaigrette, roasted vegetables, or creamy mashed potatoes.
- Salad Topper: Slice cooled chicken breasts and add them to Caesar salads, mixed greens, or grain bowls for added protein and crunch.
- Sandwich Star: Layer slices on toasted bread with lettuce, tomato, and your favorite sauce for a gourmet chicken sandwich.
Frequently Asked Questions
How can I make my Panko chicken even crispier?
To achieve maximum crispiness, ensure your chicken is thoroughly dried after brining. Use a good amount of oil for pan-frying, maintain a consistent temperature, and avoid overcrowding the pan. For baking, using a wire rack and a high oven temperature is crucial. Consider double-dipping the chicken in the egg wash and Panko for an extra thick crust.
Can I prepare the Panko-coated chicken ahead of time?
While it’s best to cook the chicken immediately after coating for optimal crispness, you can prepare the coated chicken breasts up to an hour in advance and refrigerate them on a wire rack. This allows the coating to set slightly. However, the crispest results are always achieved with freshly coated chicken.
What is the best oil for frying Panko chicken?
Neutral oils with a high smoke point are ideal. Canola oil, vegetable oil, grapeseed oil, or peanut oil are excellent choices. They can withstand the higher temperatures needed for frying without burning, which can impart an unpleasant flavor.
Why is my Panko chicken soggy?
Soggy Panko chicken is typically a result of moisture. This can happen if the chicken wasn’t adequately dried before dredging, if the oil temperature was too low, or if the pan was overcrowded, leading to steaming rather than frying. Another cause can be letting the cooked chicken sit for too long before serving, allowing steam to accumulate.
Can I freeze Panko chicken breasts?
Yes, you can freeze Panko chicken breasts, but it’s best to do so after they have been cooked and cooled. Store them in an airtight container or freezer bag with parchment paper between layers to prevent sticking. Reheat them in an oven or air fryer to restore crispness, as microwaving will likely make them soggy.
See also: Crispy Panko

