When it comes to Gluten free, “The magic of choux pastry lies in its deceptive simplicity; a few humble ingredients transformed by heat and technique into something truly ethereal.” – Pierre Hermé
- The Science Behind Gluten Free Choux Puff Success
- Expert Recommended Gluten Free Choux Pastry Recipe
- Nutritional Information (Approximate per Choux Puff, Unfilled)
- Elevating Gluten Free Choux to Culinary Artistry: Expert Pro-Tips
- The Flour Blend is Non-Negotiable
- Mastering the Panade Stage
- Egg Incorporation: Patience is Key
- Baking Strategy: The Double-Temperature Method
- Drying Out for Crispness
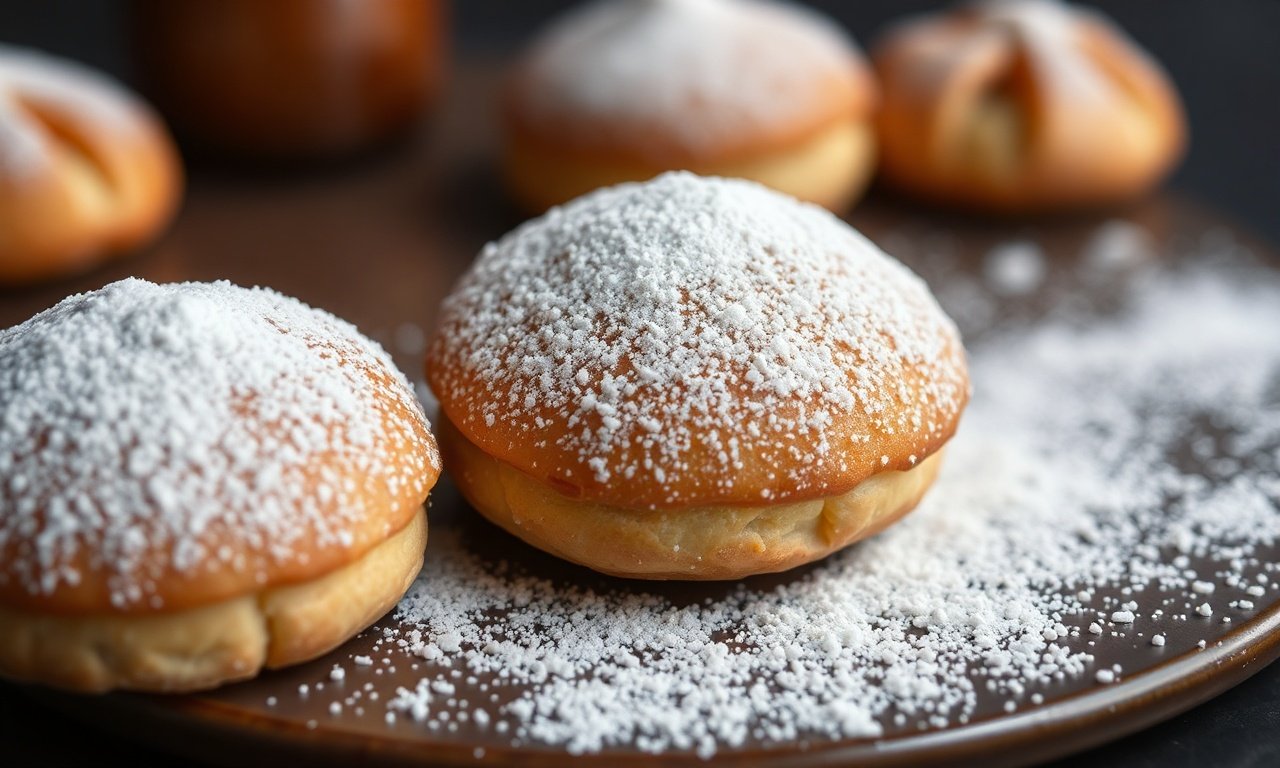
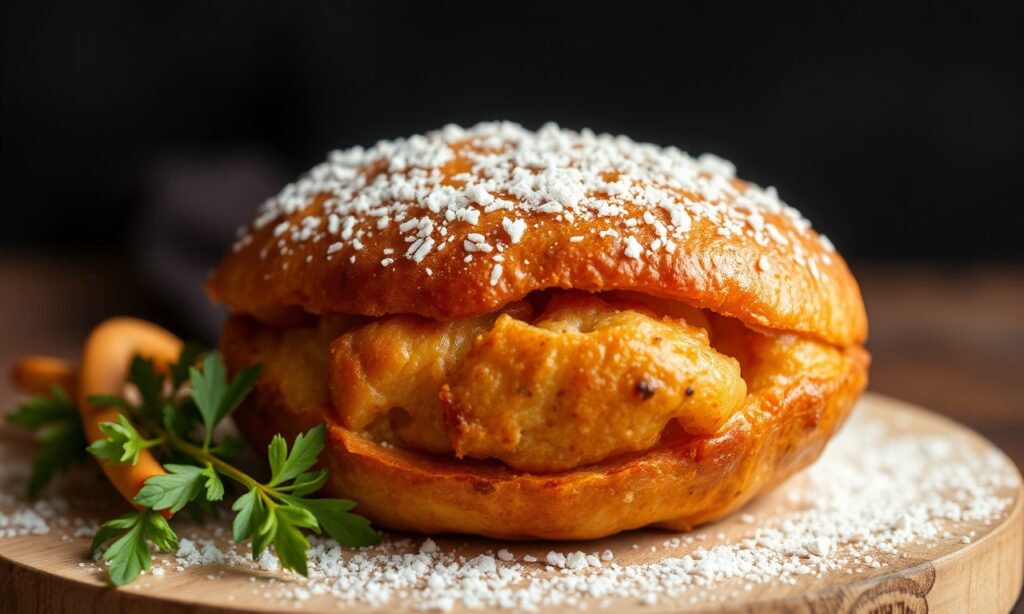
- Filling and Finishing Gluten Free Choux
- Common Pitfalls and How to Avoid Them
- Frequently Asked Questions
In the context of Gluten free, The pursuit of perfect gluten-free baking often feels like navigating a culinary labyrinth, especially when it comes to delicate pastries. Among these, choux stands as a particularly formidable challenge, its signature lightness and hollow interior seemingly reliant on the gluten network that holds traditional recipes together. Yet, culinary advancements have made achieving exquisite gluten-free choux a tangible reality. This article offers actionable insights and a proven recipe that will redefine your understanding of gluten-free patisserie, drawing from leading pastry chefs and food scientists.
Around Gluten free, When we speak of choux pastry, we are referring to a dough that is cooked twice: first on the stovetop, then in the oven. This unique process gelatinizes starches and coagulates proteins, creating a structure that puffs dramatically when steam is released during baking. The absence of gluten presents a significant hurdle, as gluten provides elasticity and stability, helping the dough trap steam and expand without collapsing. The key to successful gluten-free choux lies in meticulously replicating these essential properties using alternative ingredients and refined techniques.
Regarding Gluten free, The art of gluten-free choux is not about substitution; it’s about intelligent reconstruction. We must understand the *why* behind gluten’s role to effectively build a new framework.
When it comes to Gluten free, The journey to mastering gluten-free choux begins with a profound understanding of the flour blend. Unlike wheat flour, gluten-free flours lack the viscoelastic properties of glutenin and gliadin. Therefore, a carefully balanced blend is paramount. Experts emphasize combining starches with protein-rich flours and binders. A common recommendation involves a mix of rice flour (white and brown for structure and flavor), tapioca starch (for chewiness and binding), potato starch (for tenderness), and a small amount of sorghum or millet flour for subtle flavor and improved texture. Crucially, xanthan gum or psyllium husk acts as a vital binder, mimicking gluten’s elasticity and preventing crumbling.
A starting point often cited by professional bakers is around 50-60% starches to 40-50% other flours and binders.
In the context of Gluten free, For instance, a blend might comprise 40% rice flour, 20% tapioca starch, 20% potato starch, 15% sorghum flour, and 5% xanthan gum.
The Science Behind Gluten Free Choux Puff Success
Around Gluten free, The chemistry of choux is fascinating, and understanding it is the bedrock of gluten-free excellence. When the dough is heated on the stovetop, water evaporates, and starches swell and gelatinize. This process is critical. In a gluten-containing dough, the gluten network develops during mixing, creating a mesh that holds expanding steam. In a gluten-free version, this starch gelatinization becomes even more crucial for structure. The binder (xanthan gum or psyllium husk) matter significantly, absorbing water and forming a gel that mimics gluten’s binding and structural capabilities.
Regarding Gluten free, When the dough is baked, heat turns water into steam. This steam expands rapidly, pushing outwards and causing the choux pastry to puff. The outer layer, exposed to dry heat, crisps and solidifies, forming a shell that supports the internal structure. For gluten-free choux, the speed at which this shell forms is key. If it sets too slowly, the pastry may collapse. This is where oven temperature and initial dough consistency become critical. A sufficiently hot oven is essential to set the exterior rapidly.
Expert Recommended Gluten Free Choux Pastry Recipe
When it comes to Gluten free, Achieving restaurant-quality gluten-free choux requires precision. This recipe, developed and refined by seasoned pastry chefs, focuses on delivering that signature lightness and delicate crispness.
Ingredients:
- 120 ml (½ cup) Water
- 120 ml (½ cup) Whole Milk
- 115 g (½ cup + 1 tbsp) Unsalted Butter, cubed
- 1 tsp Granulated Sugar
- ½ tsp Salt
- 75 g (½ cup + 2 tbsp) Gluten-Free All-Purpose Flour Blend (ensure it contains xanthan gum, or add 1 tsp separately)
- 25 g (3 tbsp) Tapioca Starch
- 25 g (3 tbsp) Potato Starch (not potato flour)
- 3 Large Eggs, at room temperature (approx. 150-160g total)
- Optional: 1 tbsp Psyllium Husk Powder (if your blend doesn’t contain a strong binder)
Equipment:
- Medium saucepan
- Wooden spoon or heat-resistant spatula
- Stand mixer with paddle attachment (optional, but recommended)
- Piping bag with a large round tip (or a spoon for dropping)
- Baking sheets lined with parchment paper
Preparation Method:
- Preheat Oven & Prep Baking Sheets: Preheat your oven to 200°C (400°F). Line two baking sheets with parchment paper.
- Combine Wet Ingredients & Fats: In a medium saucepan, combine the water, milk, cubed butter, sugar, and salt. Heat over medium heat, stirring occasionally, until the butter is completely melted and the mixture just begins to simmer around the edges. Do not boil.
- Incorporate Dry Ingredients: Remove the saucepan from the heat. Add all the dry ingredients – the gluten-free flour blend, tapioca starch, potato starch, and psyllium husk powder if using – all at once. Stir vigorously with a wooden spoon or spatula until a thick dough forms and pulls away from the sides of the pan. This is called the “panade.” Continue stirring over low heat for 1-2 minutes to dry out the dough slightly. This step is crucial for developing structure.
- Cool the Dough: Transfer the dough to the bowl of a stand mixer fitted with the paddle attachment. Let it cool for 5-10 minutes, stirring occasionally. The dough should be warm to the touch, but not hot enough to cook the eggs.
- Incorporate Eggs Gradually: Add the eggs one at a time, beating well after each addition until fully incorporated. The dough will look curdled and separated at first, but keep mixing. It will gradually come together, becoming smooth, glossy, and thick. The final consistency should be pipeable but hold its shape – it should form a “V” shape when the paddle is lifted. You may not need all of the third egg; add it slowly until the desired consistency is reached.
- Pipe or Drop the Choux: Transfer the dough to a piping bag fitted with a large round tip. Pipe mounds of dough onto the prepared baking sheets, about 4-5 cm (1.5-2 inches) in diameter, leaving space between them. Alternatively, use two spoons to drop rustic mounds of dough.
- Initial Bake (High Heat): Place the baking sheets in the preheated oven (200°C / 400°F) for 10 minutes. This initial high heat is essential for rapid puffing.
- Second Bake (Lower Heat): Reduce the oven temperature to 175°C (350°F) without opening the oven door. Continue baking for another 20-25 minutes, or until the choux puffs are golden brown, firm, and sound hollow when tapped. Do not open the oven door during this stage, as it can cause them to collapse.
- Cooling and Drying: Once baked, turn off the oven. You can either poke a small hole in the side of each puff to release steam and dry them out further in the residual heat with the oven door slightly ajar for 10-15 minutes, or remove them from the oven and let them cool completely on a wire rack. Ensuring they are fully dry is key to preventing sogginess.
In the context of Gluten free, 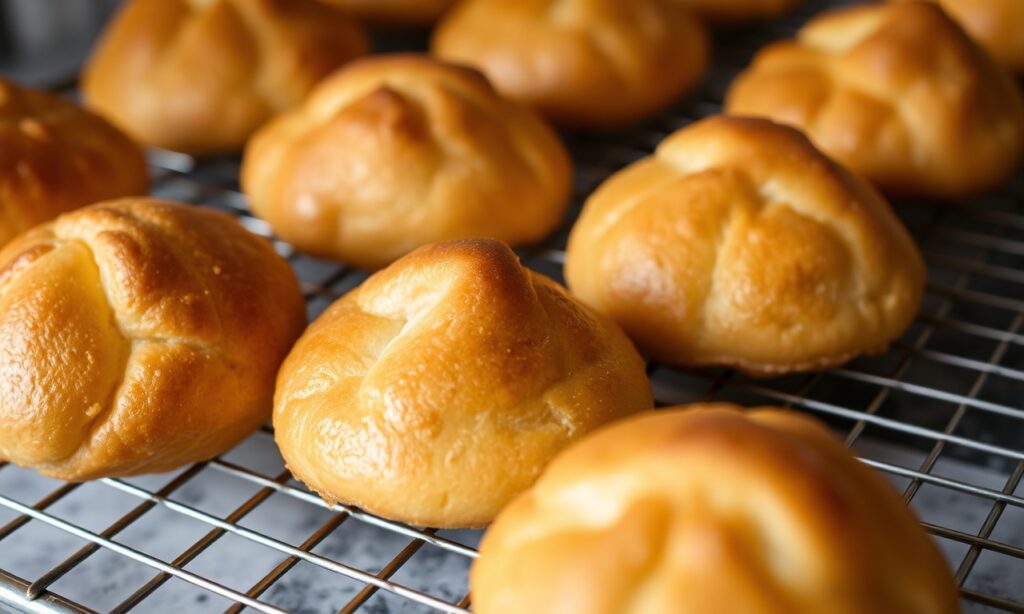
Nutritional Information (Approximate per Choux Puff, Unfilled)
- Calories: 70-90 kcal
- Fat: 4-6g
- Saturated Fat: 2-3g
- Carbohydrates: 7-9g
- Sugars: 1-2g
- Fiber: <1g
- Protein: 2-3g
- Sodium: 50-70mg
Around Gluten free, *Note: Nutritional values are estimates and can vary based on specific ingredients used and portion sizes.*
Elevating Gluten Free Choux to Culinary Artistry: Expert Pro-Tips
Regarding Gluten free, Achieving consistently excellent gluten-free choux involves more than just following a recipe. It’s about understanding the nuances of technique and ingredient interaction.
The Flour Blend is Non-Negotiable
When it comes to Gluten free, Many gluten-free all-purpose blends can be inconsistent. Experts often recommend creating your own blend from individual flours and starches. This allows for precise control over texture and binding. A good starting point is a 1:1 ratio of a neutral flour like white rice flour to a starch like tapioca or potato. Sorghum or millet flour adds a desirable complexity of flavor and a slightly softer crumb than solely rice flour. The role of xanthan gum or psyllium husk cannot be overstated; it is the backbone of gluten-free pastry. Ensure your blend contains at least 0.5-1% xanthan gum by weight.
Mastering the Panade Stage
In the context of Gluten free, The stovetop cooking of the dough, known as the panade, is where the magic truly begins. The goal is to cook out excess moisture and gelatinize the starches. Stirring the dough in the saucepan for a minute or two after adding the dry ingredients helps to achieve this. You’ll notice a thin film forming on the bottom of the pan – this is a sign that the starches are properly hydrated and beginning to break down. This dehydration step is vital for creating a dough that can hold its shape and puff effectively.
Egg Incorporation: Patience is Key
Around Gluten free, Adding eggs to the hot dough can be tricky. If the dough is too hot, it will scramble the eggs, resulting in an unusable batter. If it’s too cool, the eggs won’t emulsify properly, leading to a greasy or oily texture. The ideal scenario is a warm dough that allows the eggs to bind smoothly. Beating each egg in completely before adding the next is essential. The dough will look like it’s breaking apart initially; this is normal. Continue mixing, and it will transform into a glossy, thick paste.
Baking Strategy: The Double-Temperature Method
Regarding Gluten free, The two-stage baking process is fundamental for gluten-free choux. The initial high heat (200°C/400°F) causes the dough to expand rapidly as the steam builds up. This creates the initial puff. Immediately reducing the heat to 175°C/350°F allows the interior to cook through and the exterior to crisp up without burning. This lower temperature ensures the choux is fully baked and dried out, preventing it from collapsing once removed from the oven.
Drying Out for Crispness
When it comes to Gluten free, Even after baking, choux puffs can remain slightly moist inside, leading to sogginess. To combat this, experts recommend a post-bake drying phase. This can be achieved by poking a small vent in each puff with a skewer or knife and returning them to the oven at a very low temperature (around 100°C/200°F) for 15-20 minutes, or with the oven door slightly ajar. This allows any residual moisture to escape, resulting in a perfectly crisp shell that holds up to fillings.
Filling and Finishing Gluten Free Choux
In the context of Gluten free, The beauty of choux pastry lies in its versatility. Whether filled with classic pastry cream, whipped cream, or even savory fillings, the gluten-free base provides a delightful canvas. For pastry cream, ensure it is well-chilled and thick enough not to soak the delicate pastry shells. A well-made crème pâtissière, whether dairy-based or a dairy-free alternative using plant-based milks and cornstarch or tapioca starch for thickening, is ideal.
Around Gluten free, For éclairs, pipe the dough into elongated shapes. For profiteroles, pipe or drop small rounds. You can also create larger, hollowed-out shells for impressive desserts. Glazing with chocolate or a simple sugar glaze adds an extra layer of indulgence. Remember to fill your choux just before serving to maintain their crispness. Filling them too far in advance can lead to a soggy interior.
Regarding Gluten free, A particularly inspiring case study comes from a small artisanal bakery in London that specializes in gluten-free patisserie. They meticulously tested dozens of flour combinations and binder ratios to develop their signature gluten-free profiteroles. Their breakthrough came from using a specific blend of finely milled white rice flour, tapioca starch, and a touch of almond flour for richness, combined with psyllium husk powder for superior elasticity. They also refined their baking process to include a 10-minute steam phase at the beginning of the bake, which they found helped the gluten-free dough expand more evenly before setting. Their customers rave about the lightness and delicate crispness, proving that gluten-free choux can indeed rival its traditional counterpart.
Common Pitfalls and How to Avoid Them
- Flat or Collapsed Choux: This is usually due to insufficient oven heat, opening the oven door too early, or an overly wet dough. Ensure your oven is accurately preheated and resist the urge to peek. The dough consistency is also key – too much liquid will prevent it from holding its shape.
- Greasy or Dense Texture: This can result from adding eggs to a dough that is too hot, or from not drying out the dough sufficiently on the stovetop. The eggs should emulsify, not scramble.
- Soggy Bottoms: The choux must be fully baked and dried. The post-bake cooling and drying phase is critical here. If they’re not completely dry, they will absorb moisture from fillings very quickly.
- Cracked Exterior: While some cracking is normal and can even be desirable, excessive cracking might indicate the oven temperature was too high initially, or the dough was too stiff.
When it comes to Gluten free, The journey to perfect gluten-free choux is one of perseverance and understanding. By focusing on the science behind the pastry, employing expert-recommended ingredients and techniques, and practicing diligently, you can unlock the secret to creating these delicate, airy delights without gluten.
Frequently Asked Questions
H3: What is the best gluten-free flour blend for choux pastry?
In the context of Gluten free, The optimal gluten-free flour blend for choux pastry typically combines a base of neutral flours like white rice flour with starches such as tapioca starch and potato starch. A small amount of a more flavorful flour like sorghum or millet can add depth. Crucially, a binder like xanthan gum or psyllium husk powder is essential, usually making up 0.5-1% of the total flour weight, to mimic gluten’s elasticity and binding properties. Many experts recommend creating your own blend rather than relying on a single commercial all-purpose gluten-free flour.
H3: Why do my gluten-free choux puffs deflate after baking?
Around Gluten free, Deflation in gluten-free choux puffs is commonly caused by insufficient baking, leading to an undercooked interior that cannot support the structure as it cools. Another frequent culprit is opening the oven door too early during the baking process, which allows the steam to escape prematurely and the fragile pastry to collapse. Ensure the choux are fully baked until golden brown and sound hollow when tapped, and resist the temptation to open the oven until the end of the reduced-temperature baking phase. Also, ensure the dough is not too wet.
H3: Can I make gluten-free choux dough ahead of time?
Regarding Gluten free, While the baked gluten-free choux shells can be stored for a day or two in an airtight container at room temperature to maintain crispness, the dough itself is best used immediately after preparation. The gluten-free flours and binders begin to absorb moisture and change texture over time, which can negatively impact the puff and final consistency. For the best results, prepare the dough and bake the choux shells on the same day.
H3: What is the role of psyllium husk in gluten-free choux?
Psyllium husk powder acts as a powerful binder and can contribute to elasticity in gluten-free choux pastry, similar to xanthan gum. It absorbs a significant amount of water, forming a gel that helps to hold the dough together and trap steam during baking. Some bakers find that psyllium husk provides a slightly chewier texture and better structure compared to xanthan gum alone, or they use a combination of both for optimal results. It’s particularly useful when aiming for a more resilient dough.
H3: How do I ensure my gluten-free choux pastry is light and airy?
Achieving a light and airy gluten-free choux pastry relies on several key factors: a well-balanced flour blend with adequate binder, thorough cooking of the dough on the stovetop (the panade stage) to gelatinize starches, proper incorporation of room-temperature eggs, and a precise two-stage baking process (high heat followed by lower heat). Finally, ensuring the baked choux are thoroughly dried out before filling is crucial for maintaining their airy texture.
See also: Gluten free


