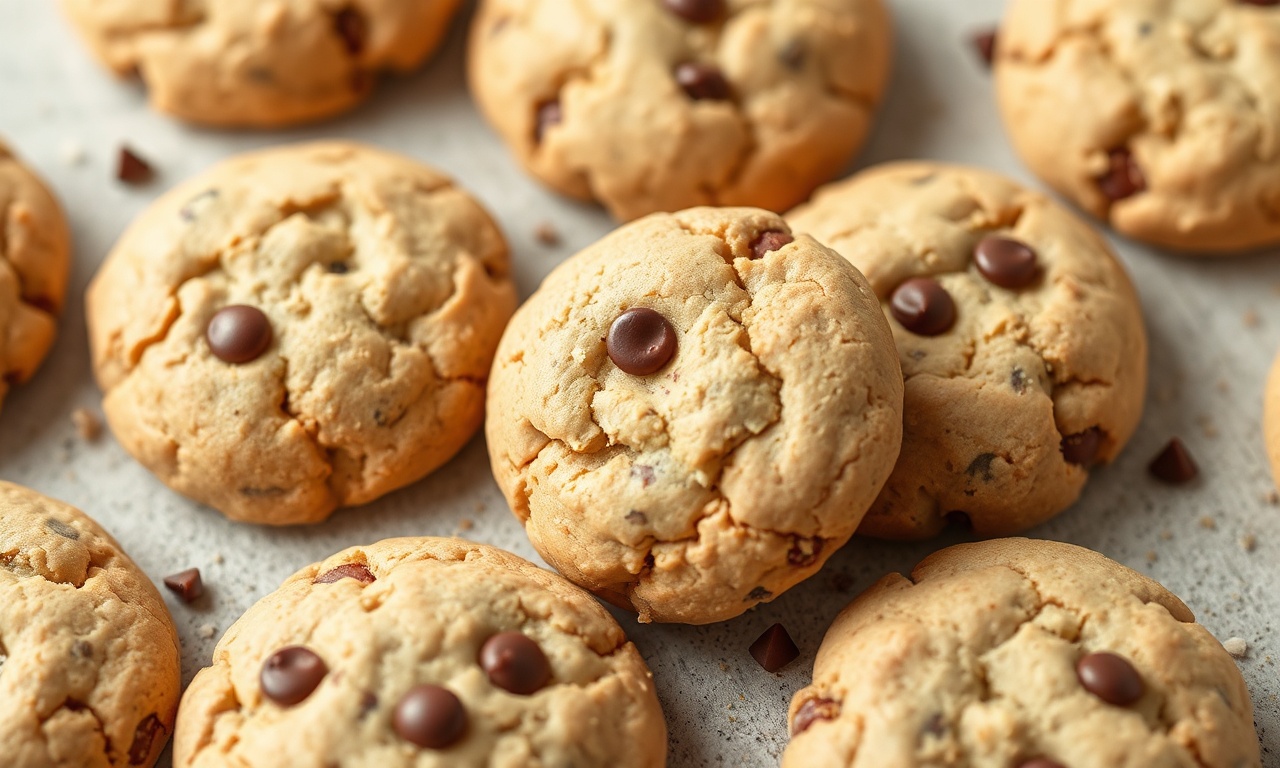
The Unseen Art of Gluten-Free Cookie Excellence
When it comes to GF cookies, The quest for a truly exceptional gluten-free cookie is often fraught with disappointment. Many home bakers, accustomed to the familiar, yielding texture of wheat-based doughs, find themselves adrift in a sea of crumbly, dry, or strangely chewy disappointments when attempting to replicate beloved recipes without gluten. It’s a culinary paradox: how can something so inherently lacking in structure achieve the delicate balance of crisp edges and a tender, melt-in-your-mouth center? The prevailing myth suggests that gluten-free baking is an exercise in compromise, a pale imitation of its conventional counterpart. This notion is inaccurate and fundamentally limits the potential of what’s achievable.
- The Unseen Art of Gluten-Free Cookie Excellence
- The Foundation: Understanding Your Gluten-Free Flour Blend
- The Role of Fat and Sweeteners in GF Cookie Structure
- Binding Agents: The Unsung Heroes of GF Dough
- The Art of Mixing: Precision Over Vigour
- The Crucial Step: Chilling the Dough
- Baking: Temperature, Time, and Visual Cues
- Cooling and Resting: The Final Frontier of Texture
- The Step-by-Step Guide to Perfect GF Cookies
- Nutritional Insights for Your Gluten-Free Indulgence
- Elevating Your GF Cookies: Pro-Tips from the Culinary Elite
- Frequently Asked Questions About GF Cookies
In the context of GF cookies, With a nuanced understanding of ingredients and technique, you can not only replicate traditional cookie perfection but, in many cases, surpass it, unlocking new dimensions of flavor and texture entirely.
The true mastery of GF cookies lies not in substituting gluten, but in understanding the synergistic dance of alternative flours, fats, and binders to create a structure that is both forgiving and delightful.
This guide is born from decades of hands-on experience, countless hours in the test kitchen, and a deep understanding of the molecular interactions that govern successful baking. We’ll move beyond superficial substitutions to explore the foundational principles that underpin genuinely outstanding GF cookies. Prepare to transform your gluten-free baking from a hopeful experiment into a reliable, repeatable triumph.
The Foundation: Understanding Your Gluten-Free Flour Blend
The single most critical factor in achieving superior GF cookies is the flour blend. Unlike wheat flour, which contains gluten that provides elasticity and structure, gluten-free flours are a diverse family, each with unique properties. A successful blend mimics the behavior of all-purpose wheat flour by combining different types of flours to achieve the desired texture and flavor. Relying on a single gluten-free flour, such as almond or coconut, rarely yields optimal results for cookies, often leading to excessive crumbliness or an unpleasant grittiness.
Around GF cookies, A well-balanced blend typically includes a base flour, a starch, and sometimes a protein-rich flour. For instance, a common and effective combination involves a base like brown rice flour or sorghum flour, a starch such as tapioca starch or potato starch, and a protein component like almond flour or oat flour (certified gluten-free, of course). The ratio is paramount. Too much starch can result in a cookie that spreads excessively and becomes brittle, while too much base flour can lead to a dense, dry outcome. The goal is to create a matrix that absorbs moisture effectively, provides a tender crumb, and binds ingredients without the elastic properties of gluten.
Regarding GF cookies, Research suggests that different flour combinations significantly impact the rheological properties of dough and the textural characteristics of baked goods, underscoring the importance of a thoughtful blend.
When it comes to GF cookies, 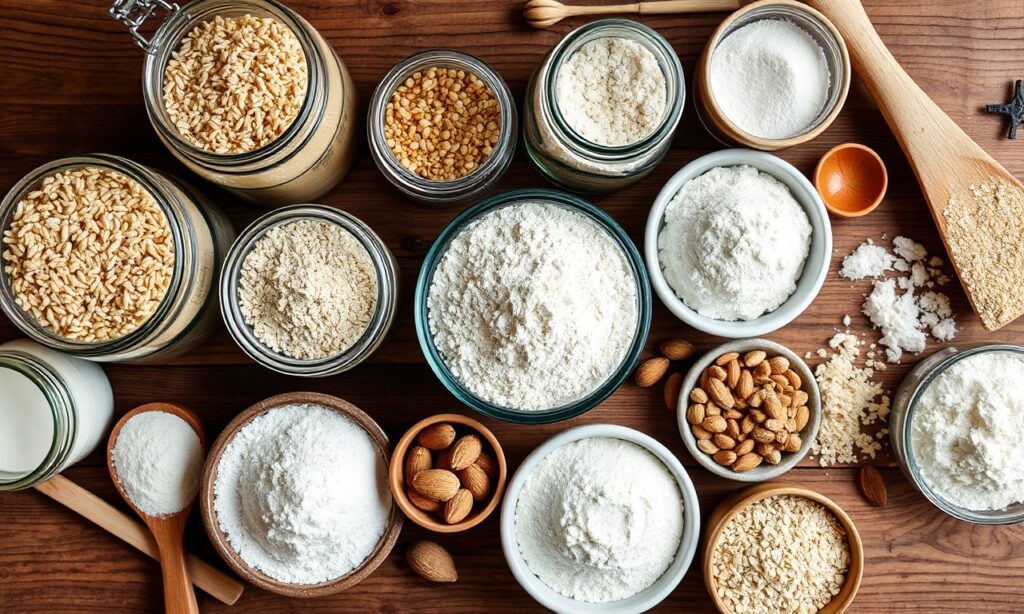
The Role of Fat and Sweeteners in GF Cookie Structure
Beyond the flour blend, the choice and proportion of fats and sweeteners matter significantly in the texture and spread of your GF cookies. Butter, with its complex flavor profile and solid fat structure, is often the go-to. However, the way butter is incorporated is crucial. Creaming softened butter with sugar until light and fluffy incorporates air, which contributes to leavening and a tender crumb. The sugar itself not only sweetens but also interacts with the flour and fat, influencing spread and browning. Granulated sugar tends to promote crispier cookies with more spread, while brown sugar adds moisture and chewiness due to its molasses content.
For dairy-free or vegan GF cookies, a high-quality vegan butter alternative or a neutral oil like refined coconut oil can be used. When substituting oil for butter, be mindful that oil is liquid at room temperature, which can lead to increased spread and a potentially greasier texture if not balanced correctly. Some bakers opt for a combination of solid fat (like vegan butter) and a small amount of oil to achieve a desirable balance of crispness and chewiness. The ratio of sugar to flour is also a key determinant of spread. A higher sugar-to-flour ratio will generally result in cookies that spread more.
Global sugar production remains a significant agricultural commodity, influencing the cost and availability of sweeteners, a factor bakers must consider.
Binding Agents: The Unsung Heroes of GF Dough
Without gluten’s natural binding capabilities, GF cookies require intelligent substitutes to hold everything together. Eggs are the traditional binder in most cookie recipes, providing moisture, richness, and structure. The protein in eggs coagulates during baking, helping to set the cookie. For vegan GF cookies, or for those with egg sensitivities, several effective alternatives exist. Psyllium husk, when mixed with water, forms a gel that mimics the binding properties of eggs. Other common egg replacers include flaxseed “eggs” (ground flaxseed mixed with water), chia seed “eggs,” or commercial egg replacers. The amount of binder needed can vary significantly depending on the specific flour blend and other ingredients.
Too little binder will result in a crumbly, unmanageable dough that falls apart, while too much can lead to a gummy or overly tough cookie.
The key is to achieve a dough that is cohesive enough to hold its shape but not so stiff that it becomes difficult to work with. This often requires a period of chilling the dough, which allows the flours to fully hydrate and the fats to firm up, making the dough easier to handle and less prone to excessive spreading. A well-hydrated dough is fundamental for successful GF cookies.
The Art of Mixing: Precision Over Vigour
The mixing process for GF cookies is where many home bakers inadvertently introduce flaws. Unlike wheat doughs, which benefit from gluten development, overmixing GF dough can actually be detrimental. The goal is to combine ingredients thoroughly and evenly without developing any unintended toughness.
The creaming of butter and sugar should be done until light and fluffy, as this incorporates air. However, once the dry ingredients are added, mix only until just combined. You should no longer see streaks of dry flour. Overmixing at this stage can break down starches, leading to a gummy texture or excessive spreading. Some recipes benefit from a brief period of chilling the dough after mixing. This allows the gluten-free flours to absorb moisture more effectively, resulting in a more cohesive dough that holds its shape better during baking. It also solidifies the fats, which helps control spread.
The Crucial Step: Chilling the Dough
This is perhaps the most frequently overlooked, yet profoundly impactful, step in achieving perfect GF cookies. Chilling the dough allows the gluten-free flours to fully hydrate. In conventional baking, gluten development contributes to structure and chewiness. In gluten-free baking, hydration is paramount for binding and texture. When GF flours hydrate, they absorb moisture and swell, creating a more stable dough matrix. This process prevents the cookies from spreading too rapidly and becoming thin and brittle.
Furthermore, chilling solidifies the fats (butter or vegan alternatives) within the dough. As these fats melt more slowly in the oven, they control the spread, allowing the cookies to bake up thicker and more tender. A minimum of 30 minutes in the refrigerator is often recommended, but longer chilling periods, even overnight, can yield even superior results, deepening the flavors and improving the texture. Many professional bakers swear by a 24-hour chill for their GF cookie doughs. Time allows molecular changes to occur that enhance structure and flavor.
Baking: Temperature, Time, and Visual Cues
Baking GF cookies requires attention to detail, as they can brown differently than their gluten-containing counterparts. The oven temperature is critical. A standard 350°F (175°C) is usually appropriate, but it’s essential to know your oven. An oven thermometer is a wise investment to ensure accuracy.
The baking time will vary depending on the size of the cookie and the specific ingredients used. A common mistake is to overbake GF cookies, which can lead to dryness and a hard texture. You are looking for visual cues: the edges should be set and lightly golden, while the center may still appear slightly soft and underdone. The cookies will continue to bake and firm up on the hot baking sheet after removal from the oven. This residual heat is crucial for achieving the perfect texture.
For instance, a cookie that looks slightly underbaked in the center when you pull it out will often be perfectly tender and chewy once it has cooled for a few minutes on the pan. Studies on baking science demonstrate that the Maillard reaction and caramelization occur at different rates depending on moisture content and sugar types, which is why visual cues are often more reliable than strict time adherence for GF baking.
Cooling and Resting: The Final Frontier of Texture
The cooling process is as vital as the baking itself. Immediately after removing the cookies from the oven, let them rest on the baking sheet for 5-10 minutes. This allows them to firm up sufficiently to be moved without collapsing. During this time, the internal structure continues to set. Then, carefully transfer the cookies to a wire rack to cool completely. This allows air to circulate around the cookies, preventing the bottoms from becoming soggy and ensuring an even crispness on the edges.
Resist the urge to taste them piping hot. The flavors and textures meld and develop as the cookies cool. Many GF cookies, especially those with a higher starch content, can improve in texture and flavor after a few hours or even overnight. This resting period allows moisture to redistribute evenly throughout the cookie, preventing both dryness and gumminess.
The Step-by-Step Guide to Perfect GF Cookies
This comprehensive guide will walk you through the process of creating undeniably delicious GF cookies, ensuring a successful outcome every time.
- Choose Your Flour Blend: Select a balanced blend of gluten-free flours. A good starting point is a mix of a neutral base flour (like brown rice or sorghum), a starch (tapioca or potato), and a protein flour (almond or certified gluten-free oat flour). Aim for approximately 60% base flour and 40% starch, with almond flour added for richness and texture.
- Cream the Fat and Sugar: In a large bowl, cream together softened butter (or vegan butter alternative) and granulated and/or brown sugar until light and fluffy. This incorporates air, which aids in leavening. For vegan cookies, ensure your butter alternative is firm at room temperature.
- Incorporate Binders and Flavorings: Beat in eggs (or your chosen egg replacer, like a flax egg) one at a time. Add vanilla extract and any other liquid flavorings.
- Combine Dry Ingredients: In a separate bowl, whisk together your gluten-free flour blend, baking soda or powder, and salt. Ensure they are thoroughly combined to prevent pockets of leavening agent or salt.
- Gently Combine Wet and Dry: Gradually add the dry ingredients to the wet ingredients, mixing on low speed or by hand until *just* combined. Do not overmix. Scrape down the sides of the bowl as needed.
- Chill the Dough: Cover the bowl tightly with plastic wrap and refrigerate for at least 30 minutes, preferably 1-2 hours, or even overnight. This step is crucial for hydration and texture.
- Preheat Oven and Prepare Baking Sheets: Preheat your oven to the temperature specified in your recipe (typically 350°F/175°C). Line baking sheets with parchment paper. This prevents sticking and ensures even browning.
- Portion the Dough: Use a cookie scoop or two spoons to portion the chilled dough into uniform balls. Place them on the prepared baking sheets, leaving ample space between each cookie to allow for spreading.
- Bake with Precision: Bake for the time indicated in your recipe, or until the edges are set and lightly golden, and the centers appear slightly soft. Keep a close eye on them, as GF cookies can bake quickly.
- Cool Properly: Let the cookies cool on the baking sheet for 5-10 minutes before carefully transferring them to a wire rack to cool completely. This allows them to firm up and achieve the perfect texture.
Nutritional Insights for Your Gluten-Free Indulgence
While the primary focus of GF cookies is enjoyment, understanding their nutritional profile can be helpful for dietary planning. A typical classic chocolate chip GF cookie, made with butter and sugar, can vary significantly based on the specific recipe and portion size.
On average, a single cookie (approximately 25-30 grams) might contain:
- Calories: 150-200 kcal
- Fat: 8-12g (with saturated fat depending on the type of fat used)
- Carbohydrates: 20-25g (with sugars accounting for a significant portion)
- Protein: 1-2g
- Fiber: 1-2g (this can be higher if using flours like almond or oat)
Keep in mind that the nutritional content can be significantly altered by ingredient choices. For instance, using alternative sweeteners like erythritol or stevia can reduce the carbohydrate and sugar content. Incorporating ingredients like nuts, seeds, or dried fruits can increase protein, fiber, and healthy fats. For precise information, it’s always best to calculate the nutritional values based on the exact ingredients and quantities used in your specific recipe.
Elevating Your GF Cookies: Pro-Tips from the Culinary Elite
Achieving that perfect, bakery-quality GF cookie often comes down to those subtle, yet critical, nuances that distinguish the ordinary from the extraordinary. These are the secrets that seasoned bakers employ to elevate their creations.
First, consider the quality of your ingredients. Using high-quality butter with a good fat content, pure vanilla extract, and premium chocolate chips makes a discernible difference in flavor. Don’t underestimate the power of a pinch of flaky sea salt sprinkled on top of the cookies just before baking; it enhances sweetness and adds a delightful textural contrast.
Another advanced technique is to slightly underbake the cookies and then press in a few extra chocolate chips or a piece of caramel into the center as soon as they come out of the oven. The residual heat will melt them beautifully, creating a decadent gooey center. For those seeking a chewier cookie, incorporating a higher ratio of brown sugar to granulated sugar, or even a tablespoon of molasses, can significantly boost chewiness. The molasses adds moisture and a complex flavor that complements many GF flour blends.
Finally, experiment with chilling times. While 30 minutes is often sufficient, you might find that a 24-hour or even 48-hour chill (if your dough components are stable) can lead to a remarkably more complex flavor profile and a superior texture. This extended rest allows the starches in your gluten-free flours to fully absorb moisture, leading to a more tender and cohesive cookie.
Frequently Asked Questions About GF Cookies
Why are my GF cookies always dry and crumbly?
This is a common lament, and it often stems from an imbalance in the flour blend or insufficient moisture. Ensure you are using a blend of flours and starches, not just one type. Almond flour and oat flour (certified gluten-free) can add much-needed moisture and fat. Also, make sure you’re not overbaking. GF cookies often look underdone when they are perfectly cooked. Resting the dough for at least 30 minutes, and ideally longer, is crucial for hydration.
How can I make my GF cookies spread more?
Increased spread is usually achieved by using a higher ratio of sugar to flour, a higher proportion of liquid fat (like oil instead of solid butter), or by ensuring the dough is at room temperature before baking. Using baking soda as the leavening agent, rather than baking powder, also tends to promote more spread. However, be cautious not to overdo it, as excessive spread can lead to thin, brittle cookies.
What is the best gluten-free flour blend for cookies?
There isn’t a single “best” blend, as it depends on the desired texture. However, a well-rounded blend often includes a base flour like brown rice flour or sorghum flour, a starch like tapioca starch or potato starch, and a protein-rich flour like almond flour or finely ground certified gluten-free oats. Ratios are key; a common starting point is 60% base flour and 40% starch, with almond flour added for richness. Many excellent pre-made blends are also available, but understanding the components will help you troubleshoot and customize.
Can I freeze GF cookie dough?
Absolutely! Freezing GF cookie dough is an excellent way to have freshly baked cookies on demand. Portion the dough into balls and place them on a parchment-lined tray to freeze until solid. Then, transfer the frozen dough balls to a freezer-safe bag or container. When ready to bake, place the frozen dough balls directly onto a baking sheet and bake as usual, adding a few extra minutes to the baking time.
Why do my GF cookies taste gritty?
A gritty texture in GF cookies is usually due to the grittiness of certain GF flours, particularly rice flour, or insufficient hydration. Grinding your own flours finely or using a blend that incorporates smoother-textured flours like sorghum or oat flour can help. Ensuring the dough is well-hydrated by allowing adequate chilling time is also essential. Some bakers find that toasting their GF flours lightly before mixing can also improve texture and flavor.
See also: GF cookies


