There’s something undeniably satisfying about sinking your spoon into a steaming bowl of hearty beef chili-the rich aroma, the bold flavors, the comforting warmth. Now, imagine capturing that cozy goodness in convenient, ready-to-go containers, waiting patiently in your freezer to save you from last-minute meal chaos. Welcome to the world of meal prep magic, where freezer-friendly beef chili transforms from a simple dinner into a culinary lifesaver. In this article, we’ll untangle the secrets to crafting delicious, make-ahead chili batches that freeze beautifully, reheat effortlessly, and deliver consistent flavor every time. Whether you’re a busy professional, a meal-planning enthusiast, or just someone who loves the idea of quick, wholesome meals, this guide will help you harness the power of your freezer-and turn your kitchen into a chili haven.
- Prep and Cook Time
- Yield
- Difficulty Level
- Ingredients
- Instructions
- Choosing the Perfect Containers for Long-Lasting Freshness
- Step-by-Step Guide to Efficiently Portioning and Storing Your Chili
- Reheating Tips to Preserve Flavor and Texture After Freezing
- Tips for Success
- Serving Suggestions
- Q&A
- Closing Remarks
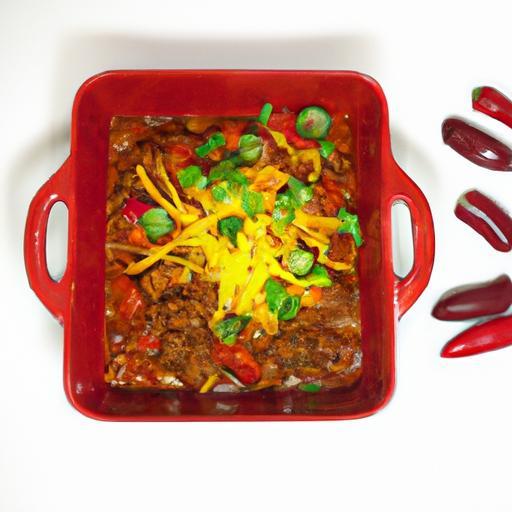
Meal Prep Magic: Freezer-Friendly Beef Chili in Containers begins with crafting layers of bold, hearty flavors that deepen after freezing, making it one of the most satisfying make-ahead meals. This classic American comfort dish, rooted in Southwestern traditions, transforms into a kitchen hero when portioned and preserved with care. Imagine a rich, spiced beef chili bursting with tender chunks of meat, robust tomatoes, and smoky undertones, ready to warm your soul on busy nights.
Prep and Cook Time
Prep Time: 15 minutes
Cook Time: 1 hour 20 minutes
Total Time: 1 hour 35 minutes
Yield
Approximately 8 servings (perfect for freezer portions)
Difficulty Level
Medium – approachable for cooks comfortable with stovetop cooking and basic meal prep techniques
Ingredients
- 2 lbs lean ground beef (85% lean recommended)
- 1 large onion, finely chopped
- 4 cloves garlic, minced
- 1 red bell pepper, diced
- 2 tbsp olive oil
- 3 tbsp chili powder
- 1 tbsp smoked paprika
- 1 tsp ground cumin
- 1 tsp dried oregano
- ½ tsp cayenne pepper (adjust to taste)
- 1 (28 oz) can crushed tomatoes
- 1 (15 oz) can kidney beans, drained and rinsed
- 1 (15 oz) can black beans, drained and rinsed
- 1 cup beef broth (low sodium preferred)
- Salt and freshly ground black pepper, to taste
- Optional garnish: chopped fresh cilantro, shredded cheddar cheese, sour cream, sliced jalapeños
Instructions
- Heat olive oil in a large heavy-bottomed pot over medium heat. Add the onion and red bell pepper, sautéing until softened and translucent, approximately 5-7 minutes.
- Add minced garlic and cook for 1 minute until fragrant, stirring constantly to avoid burning.
- Increase heat to medium-high and add the ground beef. Brown thoroughly, breaking it apart with a wooden spoon, about 8-10 minutes. Drain excess fat if desired for a leaner chili.
- Stir in chili powder, smoked paprika, cumin, oregano, cayenne, salt, and black pepper. Toast the spices in the beef mixture for 2 minutes to deepen flavor.
- Pour in crushed tomatoes and beef broth, stirring to combine thoroughly. Bring the mixture to a gentle simmer.
- Reduce heat to low, cover partially, and allow chili to cook for 45 minutes, stirring occasionally to prevent sticking. This slow simmer will marry the flavors beautifully.
- Add kidney and black beans, stirring gently, and cook uncovered for another 15 minutes to thicken the chili and let flavors meld.
- Adjust seasoning to taste with additional salt, pepper, or chili powder as needed.
- Remove from heat and let cool slightly before portioning.
Choosing the Perfect Containers for Long-Lasting Freshness
When it comes to freezing your meal prep chili, selecting the right container is essential to preserve freshness and flavor. Opt for BPA-free, freezer-safe containers with airtight lids to prevent freezer burn and maintain texture and taste. Glass containers with silicone lids are excellent for durability and reheating, while sturdy plastic snap-lock containers offer convenience. For precise portions, use containers ranging from 1 to 2 cups in size-ideal for individual servings or family-sized meals.
Step-by-Step Guide to Efficiently Portioning and Storing Your Chili
After the chili cools to room temperature (never freeze hot food directly), ladle it evenly into your chosen containers. Leave about a 1-inch gap at the top to allow for expansion. Seal containers tightly, label with the date and contents, and arrange them flat in the freezer. This technique maximizes space and ensures quick thawing later. Regularly rotate older containers to the front so you can enjoy the freshest batches first.
Reheating Tips to Preserve Flavor and Texture After Freezing
Thaw frozen chili overnight in the refrigerator for the best texture. Reheat in a saucepan over medium heat, stirring occasionally until heated through. If you’re in a hurry, microwave in a vented container at medium power in 1-minute increments, stirring to promote even heating. Avoid overheating, which can dry out the meat and cause the tomato base to become too thick. If needed, stir in a splash of broth or water to loosen the consistency while reheating. Garnish with fresh herbs, cheese, or a dollop of sour cream to revive that fresh-from-the-kitchen appeal.
Tips for Success
- For extra depth, brown the beef in batches to avoid steaming and achieve a rich crust.
- Substitute black beans with pinto or chickpeas for varying textures.
- Freeze chili in vacuum-sealed bags for maximum longevity (up to 6 months).
- Add a splash of lime juice when reheating to brighten flavors.
- For a smoky twist, incorporate a chipotle pepper in adobo sauce during cooking.
Serving Suggestions
Serve your freezer-friendly beef chili garnished with shredded sharp cheddar cheese, a sprinkle of fresh cilantro, and a scoop of cooling sour cream. Pair with warm cornbread or crunchy tortilla chips for a complete meal that satisfies every craving. A refreshing side salad or garlic roasted vegetables complement the hearty textures beautifully, creating a wholesome dinner experience.
| Nutrient | Per Serving |
|---|---|
| Calories | 320 kcal |
| Protein | 28 g |
| Carbohydrates | 20 g |
| Fat | 15 g |

Explore more hearty freezer meals in our Freezer-Friendly Dinner Recipes collection. For detailed food safety guidelines on freezing meats, visit the USDA Food Safety Information.
Q&A
Q&A: Meal Prep Magic: Freezer-Friendly Beef Chili in Containers
Q1: Why is beef chili such a great meal prep option?
A1: Beef chili is the ultimate meal prep champion! It’s hearty, packed with protein and veggies, and tastes even better after a day or two – like magic in slow-cooked form. Plus, it freezes beautifully, making it a time-saving superstar for busy weeks ahead.
Q2: How do you make beef chili freezer-friendly?
A2: The secret lies in proper cooling and portioning. After cooking your chili, let it cool to room temperature before spooning it into airtight freezer-safe containers. Leaving a bit of headspace allows the chili to expand as it freezes, preventing container bursts. Label and date, then freeze!
Q3: What containers work best for freezing chili?
A3: Choose containers that seal tightly and are freezer-approved. BPA-free plastic containers, glass containers with silicone seals, or heavy-duty freezer bags all do the trick. Just make sure they’re stackable for easy storage and sized for single or family-sized portions.
Q4: How long can you store beef chili in the freezer?
A4: Your chili magic can last up to 3-4 months in the freezer without losing flavor or texture. For the tastiest results, aim to eat it within 2 months. Beyond that, it’s still safe but might start to lose its vibrant taste.
Q5: What’s the best way to reheat freezer chili?
A5: Defrost overnight in the fridge or use the microwave’s defrost setting. Then, reheat on the stove or microwave until it’s piping hot. Stir occasionally to ensure even heating and keep that chili charm intact.
Q6: Can you customize beef chili before freezing?
A6: Absolutely! Customize to your taste by adding beans, corn, peppers, or extra spices before freezing. Just avoid dairy or delicate herbs until after reheating-they don’t freeze well but can be stirred in fresh for a flavor boost.
Q7: Any tips to keep freezer chili fresh and flavorful?
A7: Yes! Cool chili completely before freezing, use airtight containers, and don’t overfill. Freeze in portion sizes you’ll actually eat to avoid repeated thawing and refreezing. For an extra flavor kick, add fresh toppings like sliced avocado, shredded cheese, or a dollop of sour cream right after reheating.
Q8: What makes this method ‘Meal Prep Magic’?
A8: It’s all about turning a one-time cooking session into multiple quick, nutritious meals-no daily kitchen hustle required. The freezer-friendly chili containers are your secret weapon for stress-free dinners, energizing lunches, or even comforting snacks. Pure kitchen wizardry!
Closing Remarks
As the aroma of hearty spices fades and the last container seals with a satisfying snap, you’re left with more than just a meal-you’ve crafted a culinary time capsule. This freezer-friendly beef chili isn’t just a recipe; it’s your secret weapon against busy days, a comforting hug waiting in the wings, and a testament to the power of thoughtful preparation. So next time life rushes in, remember: with a little meal prep magic, delicious, nourishing dinners are always just moments away. Warm up, dig in, and savor the convenience of homemade goodness on your terms.


