In the world of culinary art, salads have evolved far beyond simple leafy greens tossed with dressing. Enter the realm of layered elegance-where each ingredient is thoughtfully arranged to create a visual symphony of color, texture, and flavor. Crafting stunning salads step-by-step is not just about combining elements; it’s about celebrating the harmony between freshness and design. This approach transforms an everyday dish into an irresistible masterpiece, inviting you to savor every bite with both your eyes and palate. Join us as we delve into the secrets of layered salads, unlocking techniques that elevate your creations from the ordinary to the extraordinary.
Layered Elegance introduces an exquisite approach to salad-making that celebrates the vibrant colors and diverse textures of fresh ingredients. This technique transforms a simple salad into a stunning visual masterpiece and a flavor symphony, perfect for impressing guests or elevating everyday meals. Drawing inspiration from classic European trifle presentations and Mediterranean mezze platters, the layered salad invites creativity while emphasizing balance and harmony.
Prep and Cook Time
Preparation: 25 minutes | Chilling: 30 minutes | Total Time: 55 minutes
Yield
Serves 6-8 as a side dish
Difficulty Level
Medium – requires attention to layering and ingredient prep
Ingredients
- 4 cups mixed baby greens, thoroughly washed and dried
- 1 cup cherry tomatoes, halved
- 1 cup cucumber, peeled and diced
- 1/2 cup yellow bell pepper, finely chopped
- 1/2 cup red onion, thinly sliced
- 1 cup cooked quinoa, cooled
- 1 cup cooked chickpeas, rinsed and drained
- 1/2 cup shredded carrots, fresh and crisp
- 1 avocado, sliced just before layering
- 1/2 cup crumbled feta cheese
- 1/4 cup toasted walnuts, roughly chopped
- Fresh herbs (parsley, mint, and dill), finely chopped, about 2 tbsp total
- For the dressing:
- 3 tbsp extra virgin olive oil
- 1 tbsp fresh lemon juice
- 1 tsp Dijon mustard
- 1 garlic clove, minced
- Salt and freshly ground black pepper to taste
Instructions
- Prepare the dressing: In a small bowl, whisk together olive oil, lemon juice, Dijon mustard, minced garlic, salt, and pepper until emulsified. Set aside.
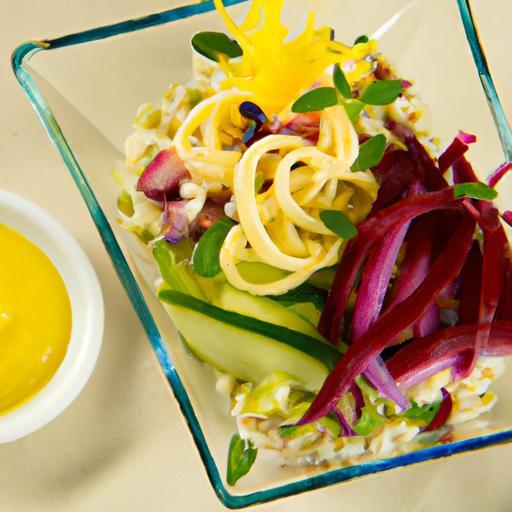
- Assemble the base: In a large clear glass bowl or trifle dish perfect for showcasing layers, start by evenly spreading the mixed baby greens. This leafy base provides a vibrant green canvas.
- Create subsequent layers: Add a layer of cherry tomatoes, followed by diced cucumber, and then yellow bell pepper. Spread each carefully to maintain distinct layers visible through the glass.
- Distribute red onion and chickpeas: Add thin slices of red onion for sharpness, then layer the chickpeas for protein and texture. Use a gentle hand to avoid mixing ingredients.
- Next, layer cooked quinoa and shredded carrots: The quinoa adds nuttiness and bulk, while carrots provide a sweet crunch.
- Top with avocado slices: Arrange the avocado delicately so it stays bright and doesn’t brown prematurely.
- Add cheese and nuts: Sprinkle the crumbled feta and toasted walnuts evenly, introducing creamy and crunchy notes essential to balance the salad.
- Finish with fresh herbs: Scatter the finely chopped parsley, mint, and dill to infuse vibrant aroma and freshness.
- Chill and dress: Cover the salad with plastic wrap and refrigerate for about 30 minutes. Just before serving, drizzle the prepared dressing evenly over the top or serve on the side.
- Gently toss or serve layered: For maximum visual impact, serve the salad as-is, allowing guests to admire the layers; or gently toss to blend the flavors and textures harmoniously.
Chef’s Notes
- To keep avocado slices fresh longer, lightly brush them with lemon juice before layering.
- Substitute quinoa with couscous or bulgur for a variation in texture.
- For a vegan version, omit feta cheese and replace with marinated tofu cubes or roasted chickpeas.
- Make this salad ahead but keep the dressing separate to avoid sogginess. Assemble layers an hour in advance for ease.
- If layering in a deep container, compress ingredients slightly but don’t pack tightly-this maintains airiness and prevents bruising.
Serving Suggestions
Serve your layered masterpiece in a clear glass bowl or individual mason jars to emphasize the beautiful strata. Garnish with a sprig of fresh herbs and a lemon wedge on the side for a zesty finish. This salad pairs wonderfully with grilled chicken or seafood, making it a versatile dish for picnics, brunches, and festive gatherings.
| Nutrient | Per Serving |
|---|---|
| Calories | 220 |
| Protein | 8g |
| Carbohydrates | 28g |
| Fat | 9g |
 crafting stunning salads step-by-step” class=”wp-image-1234″ />
For a deeper dive into salad dressings and flavor pairings, visit Serious Eats’ vinaigrette guide. To explore other salad styles, check out our article on Crisp Crunchy Summer Salads.
Q&A
Q&A: Layered Elegance – Crafting Stunning Salads Step-by-Step
Q1: What makes a salad “layered” and why is layering important?
A1: A layered salad is one where ingredients are carefully arranged in distinct strata rather than tossed together. This technique creates visual appeal, highlights textures and colors, and ensures every bite offers a balanced flavor experience. Layering transforms a simple salad into an artful composition that’s as delightful to behold as it is to eat.
Q2: How do I choose ingredients that work well together in a layered salad?
A2: Start with a foundation-usually something crisp or hearty like lettuce, kale, or grains. Then build through complementary textures and flavors: creamy elements (avocado, cheese), crunchy ingredients (nuts, seeds), and bursts of sweetness or acidity (fruits, vinaigrettes). Layer with color contrast in mind for maximum visual impact.
Q3: What’s the best order to layer salad components?
A3: Begin with heavier, denser ingredients on the bottom (like beans, grains, or root vegetables) to provide stability. Next, add mid-weight items such as sliced cucumbers, tomatoes, or shredded carrots. Top off with delicate leaves and garnishes like fresh herbs or edible flowers. This order helps keep ingredients fresh and prevents sogginess.
Q4: Can you share a step-by-step outline for assembling a layered salad?
A4: Absolutely!
- Choose a clear glass bowl or jar to showcase layers.
- Lay down the base layer (cooked quinoa or chickpeas).
- Add a vibrant vegetable layer (cherry tomatoes, corn).
- Follow with creamy or soft cheese or avocado slices.
- Sprinkle crunchy nuts or seeds next.
- Place a leafy green layer (baby spinach or arugula).
- Finish with fresh herbs or edible flowers on top.
- Drizzle dressing just before serving to maintain crispness.
Q5: How can I keep a layered salad fresh if preparing ahead of time?
A5: The secret is to store the dressing separately and add it only when ready to serve. Use airtight containers and refrigerate promptly. Place moisture-heavy ingredients towards the bottom and delicate greens near the top. Layering in a jar with a tight lid preserves the salad’s texture and color until it’s time to enjoy.
Q6: Are layered salads suitable for all occasions?
A6: Absolutely! Their visual wow-factor makes them perfect for casual lunches, elegant dinner parties, potlucks, or picnic spreads. Layered salads embody both creativity and nutrition-ideal for any event where you want to impress with healthy, beautiful food.
Q7: Any tips for beginners wanting to try layered salads?
A7: Start simple. Pick 4-5 ingredients with contrasting colors and textures. Use a clear container to see your progress and have fun experimenting with combinations. Remember, there’s no wrong way-each layer tells your own edible story of flavor and style. Embrace the process and watch your salad flourish into layered elegance!
To Wrap It Up
As you embark on your own journey of crafting salads with layered elegance, remember that each ingredient is a brushstroke on your culinary canvas. By thoughtfully combining textures, colors, and flavors step-by-step, you transform a simple dish into a vibrant masterpiece. Whether for a casual lunch or a sophisticated gathering, these salads invite you to celebrate freshness and creativity in every bite. So go ahead-layer with intention, plate with pride, and watch your salads become stunning stars of the table.


