There’s something truly magical about the aroma of freshly baked bread wafting through your home-a warm, comforting scent that invites everyone to gather around. But what if that magic didn’t have to come with a hefty price tag? Enter the world of budget-friendly baking, where simple ingredients and a little time transform into golden, crusty loaves that don’t just fill your belly, but also keep your wallet happy. In this article, we’ll explore the art of crafting cheap homemade bread easily, unlocking tips, tricks, and foolproof recipes that turn everyday pantry staples into blissful, budget-conscious bites. Get ready to dust off your mixing bowl and discover the delightful harmony of saving money while savoring every slice.
Bake Budget Bliss starts with smart choices that maximize flavor without stretching your wallet. Selecting affordable ingredients doesn’t mean settling for bland bread – it’s about understanding the essentials that transform simple pantry staples into irresistible homemade loaves. Flour, yeast, salt, and water form the backbone, but knowing where to shop and what to buy makes all the difference.
Prep and Cook Time
Preparation: 15 minutes
Rising Time: 1 hour 30 minutes
Baking: 25 minutes
Total Time: Approximately 2 hours 10 minutes
Yield
Makes 1 loaf (about 12 slices)
Difficulty Level
Easy – perfect for beginners and those short on time
Ingredients
- 3 cups all-purpose flour, sifted
- 1 packet (2 1/4 tsp) active dry yeast
- 1 1/4 cups warm water (around 110°F / 43°C)
- 1 tbsp granulated sugar or honey
- 1 tsp salt
- 1 tbsp olive oil (optional for softer crust)
Instructions
- Activate the yeast: In a small bowl, combine warm water, sugar, and yeast. Stir gently and let sit for 5-7 minutes until frothy. This guarantees your yeast is alive and ready to work magic.
- Mix the dough: In a large mixing bowl, combine flour and salt. Make a well in the center and pour in the yeast mixture and olive oil. Stir with a wooden spoon until dough begins to come together.
- Knead the dough: Transfer to a floured surface and knead for 8-10 minutes until the dough is smooth, elastic, and slightly tacky. If it’s too sticky, add a sprinkle of flour – but less is more to keep your loaf tender.
- First rise: Lightly oil a clean bowl, place the dough inside, and cover with a damp kitchen towel or plastic wrap. Let it rise in a warm, draft-free place for about 1 hour or until doubled in size.
- Shape and rest: Punch down the risen dough to release air. Shape into a tight oval or round loaf and set it on a parchment-lined baking sheet or into a greased loaf pan. Cover and let it rise for 20-30 minutes.
- Preheat and score: Preheat your oven to 375°F (190°C). Before baking, use a sharp knife or bread lame to make shallow slashes on the dough’s surface – this helps control expansion and creates an appealing crust.
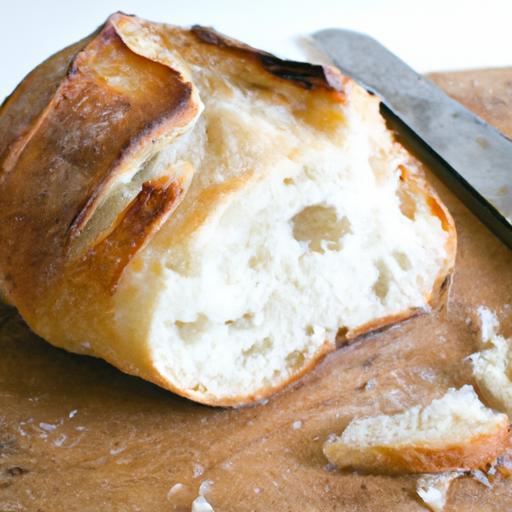
- Bake: Place the loaf in the oven and bake for 25 minutes or until the crust is golden brown and the bread sounds hollow when tapped on the bottom.
- Cool: Transfer the loaf to a wire rack to cool completely before slicing – this final rest ensures a perfect crumb texture without gumminess.
Tips for Success
- Flour alternatives: For even more budget-friendly bread, mix half all-purpose with half whole wheat flour for deeper flavor and added nutrition.
- Yeast substitutes: Rapid-rise yeast speeds up the process, letting you bake delicious bread in under 90 minutes.
- Make ahead: Dough can be refrigerated overnight after the first rise – just shape and bake fresh the next day to save time.
- Troubleshooting: If dough feels dense, add a little more warm water incrementally; if it doesn’t rise, check the freshness of your yeast.
- Flavor boosts: Stir in herbs like rosemary or thyme, or fold in grated cheese before the second rise to elevate your loaf effortlessly.
Serving Suggestions
Slice warm homemade bread and serve with a generous slather of softened butter or a drizzle of olive oil and balsamic vinegar. It pairs beautifully with hearty stews, fresh salads, or a simple spread of smashed avocado topped with chili flakes for a quick snack. Garnish with fresh herbs or a sprinkle of flaky sea salt to intensify flavors and make your presentation shine.
| Nutrient | Per Slice |
|---|---|
| Calories | 120 |
| Protein | 4g |
| Carbohydrates | 22g |
| Fat | 1g |

For more in-depth tips on baking techniques, check out our easy bread recipes guide.
Discover the science behind yeast fermentation on King Arthur Baking’s official site.
Q&A
Q&A: Bake Budget Bliss – Crafting Cheap Homemade Bread Easily
Q1: Why should I bake my own bread instead of buying it?
A: Baking your own bread is like creating a little magic – you control the ingredients, save money, and enjoy the freshest loaf imaginable. Plus, homemade bread has that unbeatable aroma that fills your home with warmth and comfort. It’s cheaper and healthier, turning your kitchen into a bakery without the hefty price tag.
Q2: What are the key ingredients for cheap homemade bread?
A: The beauty of budget bread lies in simplicity. Flour, water, yeast, salt, and a pinch of sugar are all you need. These basic pantry staples cost next to nothing but come together to create a soft, crusty, delicious loaf. No fancy gadgets or obscure ingredients required!
Q3: How can I save on the cost of ingredients?
A: Buy in bulk when possible – large bags of flour are much cheaper per pound. Opt for active dry yeast instead of instant, and watch for sales on salt and sugar. Also, try using tap water instead of bottled water; it works perfectly fine for bread. Every small saving stacks up!
Q4: Is homemade bread difficult to make?
A: Not at all! With a simple recipe, a bit of patience, and some practice, anyone can bake bread that rivals a bakery’s. No kneading? No problem! There are “no-knead” recipes that require virtually no effort but deliver amazing results. It’s baking made easy and fun.
Q5: How long does it take to make bread from scratch?
A: The actual hands-on time is minimal-often under 15 minutes. Most of the time is spent letting the dough rise, which you can use to prepare other things or just relax. In about 3 to 4 hours total, you’ll have a fresh loaf ready to enjoy!
Q6: Can I customize homemade bread on a budget?
A: Absolutely! Add herbs from your garden, a spoonful of honey, or a handful of oats or seeds if you have them on hand. These little touches add flavor and texture without breaking the bank. Creativity is key in budgeting bliss.
Q7: What’s the secret to a perfect crust on inexpensive bread?
A: Steam is your best friend. Place a small pan of water in the oven while baking to create steam, which helps develop a crisp, golden crust. Also, preheat your oven thoroughly so the bread bakes evenly and beautifully.
Q8: How can baking bread improve my budget?
A: Baking reduces the need to buy expensive artisanal loaves. A homemade loaf often costs a fraction of the store-bought price. When you bake regularly, those savings grow, leaving more room in your budget for other essentials-or treats!
Q9: What’s the best way to store homemade bread?
A: Keep it in a paper bag or wrapped in a clean tea towel at room temperature to preserve the crust’s texture. For longer storage, slice and freeze your bread. When craving fresh-baked goodness, just toast slices right from the freezer!
Q10: Where should beginners start?
A: Begin with a no-fuss recipe like a basic no-knead bread, then explore from there. Don’t worry about perfection-every loaf teaches you something new. Soon, you’ll be crafting budget-friendly bread bliss that fills your kitchen and heart alike.
Insights and Conclusions
As the comforting aroma of your freshly baked bread fills the kitchen, you realize that creating budget-friendly homemade loaves isn’t just about saving money-it’s about crafting moments of joy, one simple recipe at a time. With basic ingredients and a pinch of patience, Bake Budget Bliss transforms everyday baking into an accessible art, proving that delicious, wholesome bread doesn’t have to come with a hefty price tag. So next time you crave that warm, crusty goodness, remember: your best loaf is just a few folds and rises away, bringing both savings and satisfaction straight from your oven to your table. Happy baking!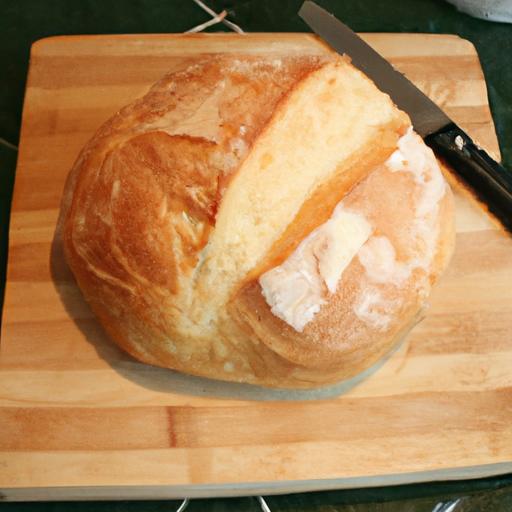


